How we automated 60 screenshots with Playwright
Keeping the visual documentation of an app that changes every week up to date is a nightmare. Here's how we used Playwright to automate the generation of more than 60 screenshots in Ofusca, with WebP optimization included.

Every time we changed a button, a dialog, or a panel in Ofusca, we had to go through the same ritual: open the app, navigate to the right state, take the screenshot, crop it, export it, replace the file. Multiplied across more than 60 screenshots spread over 46 help sections, the process ate up hours that should've gone into writing code. For a more detailed comparison, in visual regression with pixelmatch we analyze the differences. We talk about this in more detail in environment variables in E2E scripts.
We decided to let an automated browser do it for us. This article explains how we used Playwright to generate every screenshot for Ofusca's Help page in a reproducible, consistent way, and in two optimized formats.
What Ofusca is and why it needs so many screenshots
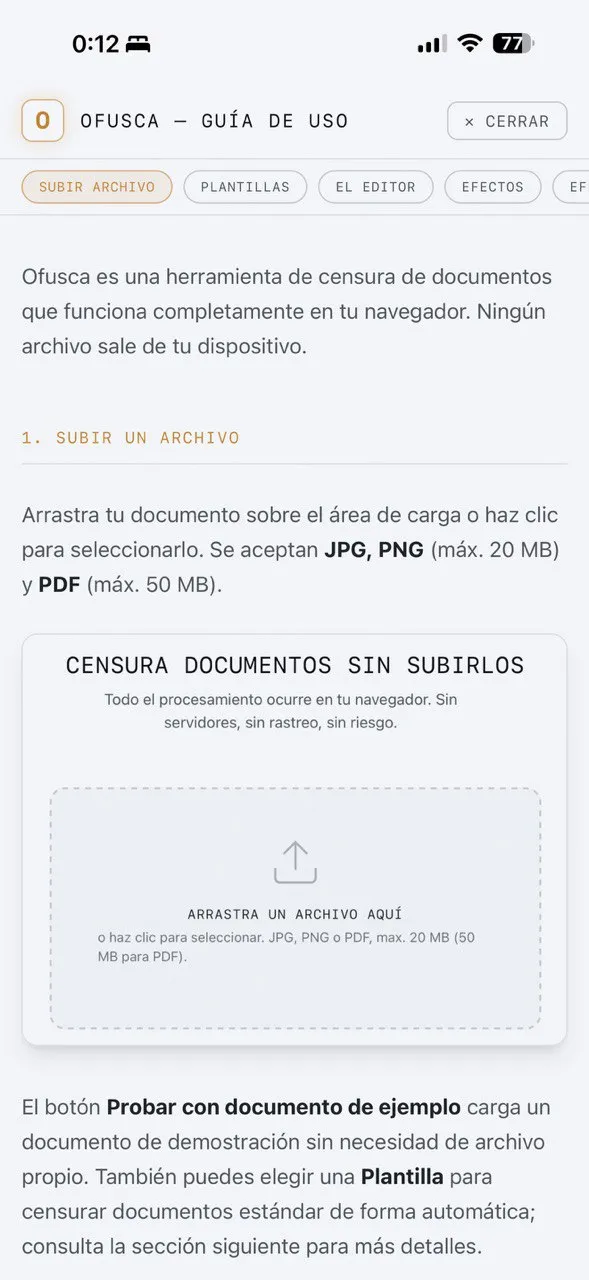
Ofusca is a document redaction web app that runs 100% in the browser, no file ever leaves the user's device. It can apply redaction effects (solid, blur, pixel, halftone, stroke, stamp), detect faces automatically, search text with OCR, process image batches, sign documents with steganography, and a lot more.

The built-in Help page has 7 categories and 46 sections with full visual documentation. Each section shows the interface in a specific state: a dialog open, a panel expanded, a detection result. Keeping those images updated by hand had become unsustainable.
Why Playwright and not another tool
We looked at several options before deciding:
- Manual screenshots, which is what we wanted to get rid of. Slow, inconsistent, and prone to human error (wrong resolution, incomplete state).
- Puppeteer. Chromium only. Playwright supports Chromium, Firefox, and WebKit from the same API.
- Cypress. Built for testing, not asset generation. Heavier setup for this use case.
- Playwright. Native screenshot API, powerful selectors, full control over the viewport, and support for complex interactions (dragging, clicking coordinates, waiting for animations).
Playwright gives us exactly what we needed, launch a browser, move the interface into a precise state, and take the picture. Nothing else.
The base setup
The starting point is a minimal playwright.config.ts. We don't need reporters, aggressive parallelism, or retries: the script runs locally against the development server.
import { defineConfig, devices } from "@playwright/test";

export default defineConfig({
  testDir: "./screenshots",
  timeout: 60_000,
  use: {
    baseURL: "http://localhost:5173",
    screenshot: "off", // las tomamos manualmente
    viewport: { width: 1440, height: 900 },
  },
  projects: [
    {
      name: "desktop",
      use: { ...devices["Desktop Chrome"] },
    },
  ],
});
We lock the viewport to 1440 × 900 for every desktop screenshot. That makes every image the same size and keeps interface elements in the same relative position every time.
The capture script, step by step
At the core is a helper function that wraps the capture and conversion logic:
import { type Page } from "@playwright/test";
import sharp from "sharp";
import path from "node:path";

const HELP_DIR = path.resolve("public/help");

async function capture(page: Page, name: string) {
  const pngPath = path.join(HELP_DIR, `${name}.png`);
  const webpPath = path.join(HELP_DIR, `${name}.webp`);

  // Captura PNG a resolución completa
  await page.screenshot({ path: pngPath, fullPage: false });

  // Convierte a WebP con calidad 80 (buen equilibrio tamaño/calidad)
  await sharp(pngPath).webp({ quality: 80 }).toFile(webpPath);

  console.log(`✓ ${name} → PNG + WebP`);
}
Each call to capture() produces two files: the original PNG (fallback for older browsers) and an optimized WebP version. That way, the help component can serve the most efficient format depending on browser support.
Preparing the interface state
Before taking the shot, we need to move the app into the exact state we want to document. This is where Playwright really shines: we can load a sample document, open dialogs, select tools, and wait for animations to finish.
import { test } from "@playwright/test";

test("capture help screenshots", async ({ page }) => {
  await page.goto("/");

  // Cargar documento de demostración
  await page.click('button:has-text("Probar con documento de ejemplo")');
  await page.waitForSelector("canvas", { state: "visible" });

  // ─── Panel de efectos ───
  await capture(page, "effects-panel");

  // ─── Detección de caras ───
  await page.click('button:has-text("Detección de caras")');
  await page.waitForSelector('[role="dialog"]', { state: "visible" });
  await capture(page, "det-caras");
  await page.click('button:has-text("Cancelar")');

  // ─── Procesamiento por lotes ───
  await page.click('button:has-text("Lotes")');
  await page.waitForSelector('[role="dialog"]', { state: "visible" });
  await capture(page, "batch-mode");
  await page.click('button:has-text("Cancelar")');

  // ─── Censura automática ───
  await page.click('button:has-text("Auto-censurar")');
  await page.waitForTimeout(1500); // esperar resultado de detección
  await capture(page, "auto-censurar");
});
Each block follows the same pattern, navigate → wait → capture → close. By chaining all the screenshots into a single test, we take advantage of the app already being loaded and avoid restarting the browser 60 times.
Capturing complex interface states
Not every screenshot is as simple as clicking a button. Some states need more elaborate interactions:
Modal dialogs
Ofusca shows dialogs for face detection, redaction verification, batch processing, and more. Each one opens through a specific action and needs time to load data.
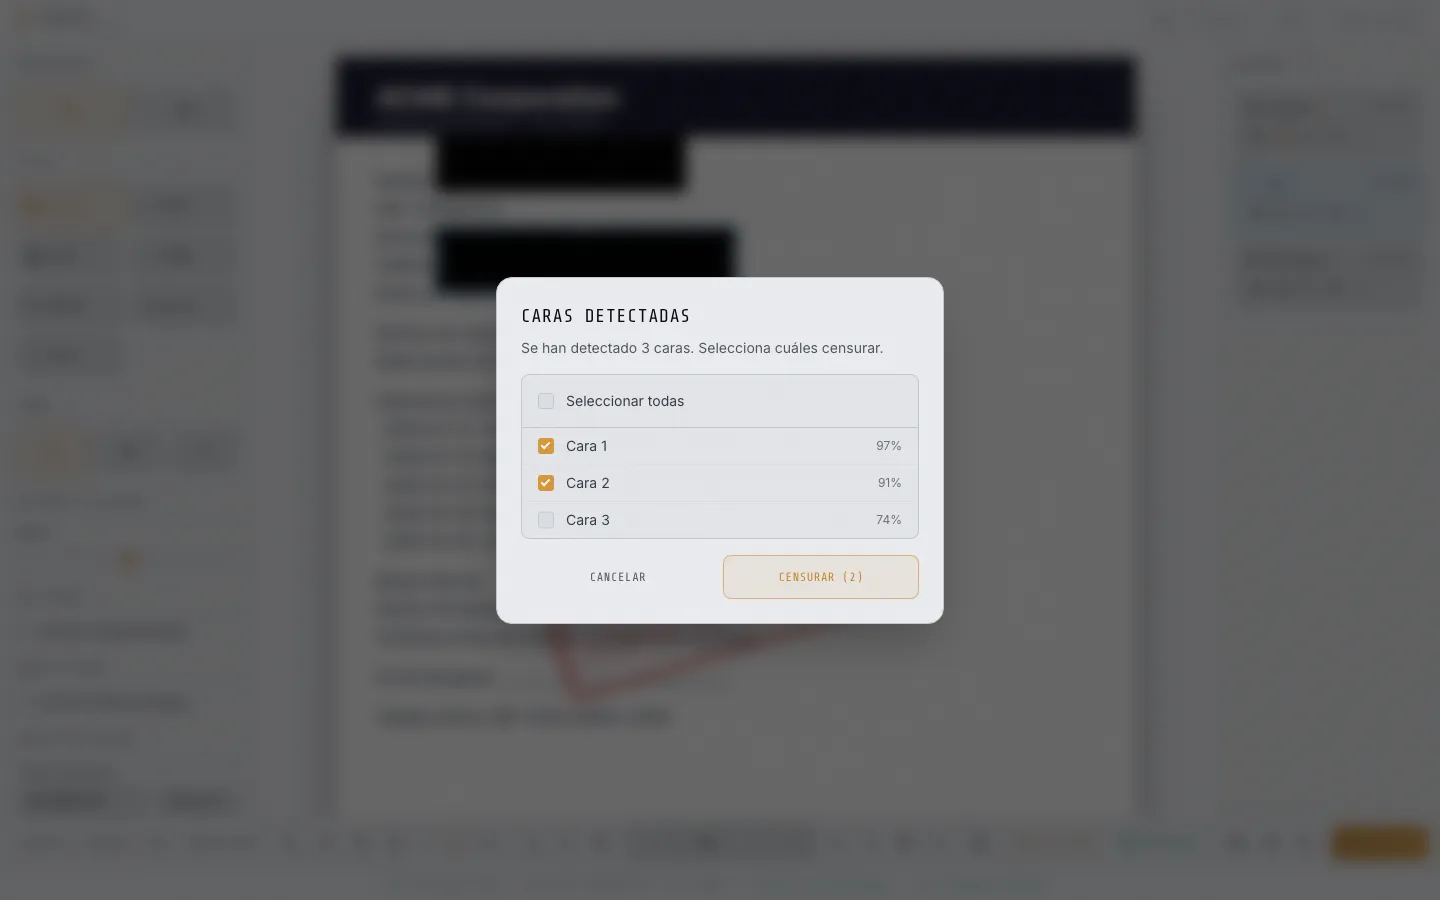
The face detection dialog, for example, needs the local AI model to finish processing before we can capture the result with the three identified faces and their confidence scores.
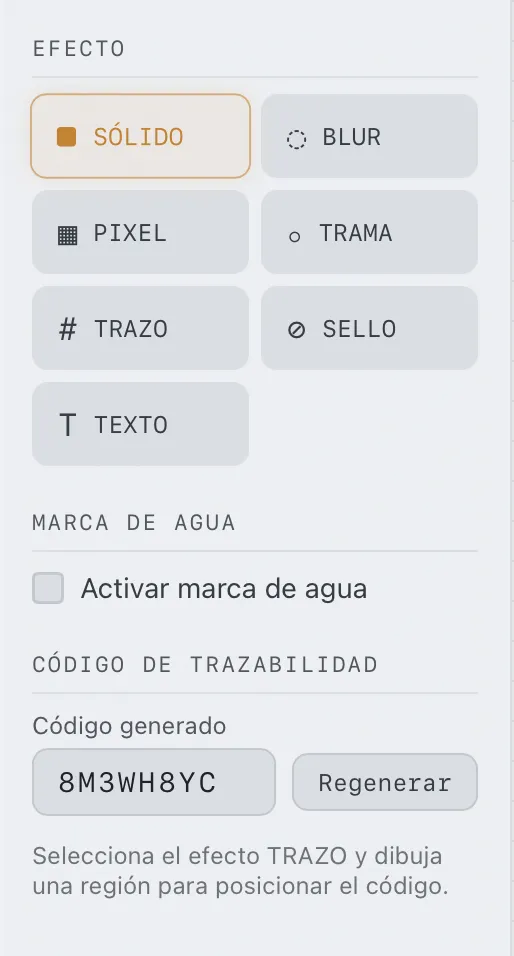
Effects panel and tools
The side panel shows the seven available redaction effects. To capture it in its full state, we need a document loaded and the panel visible:
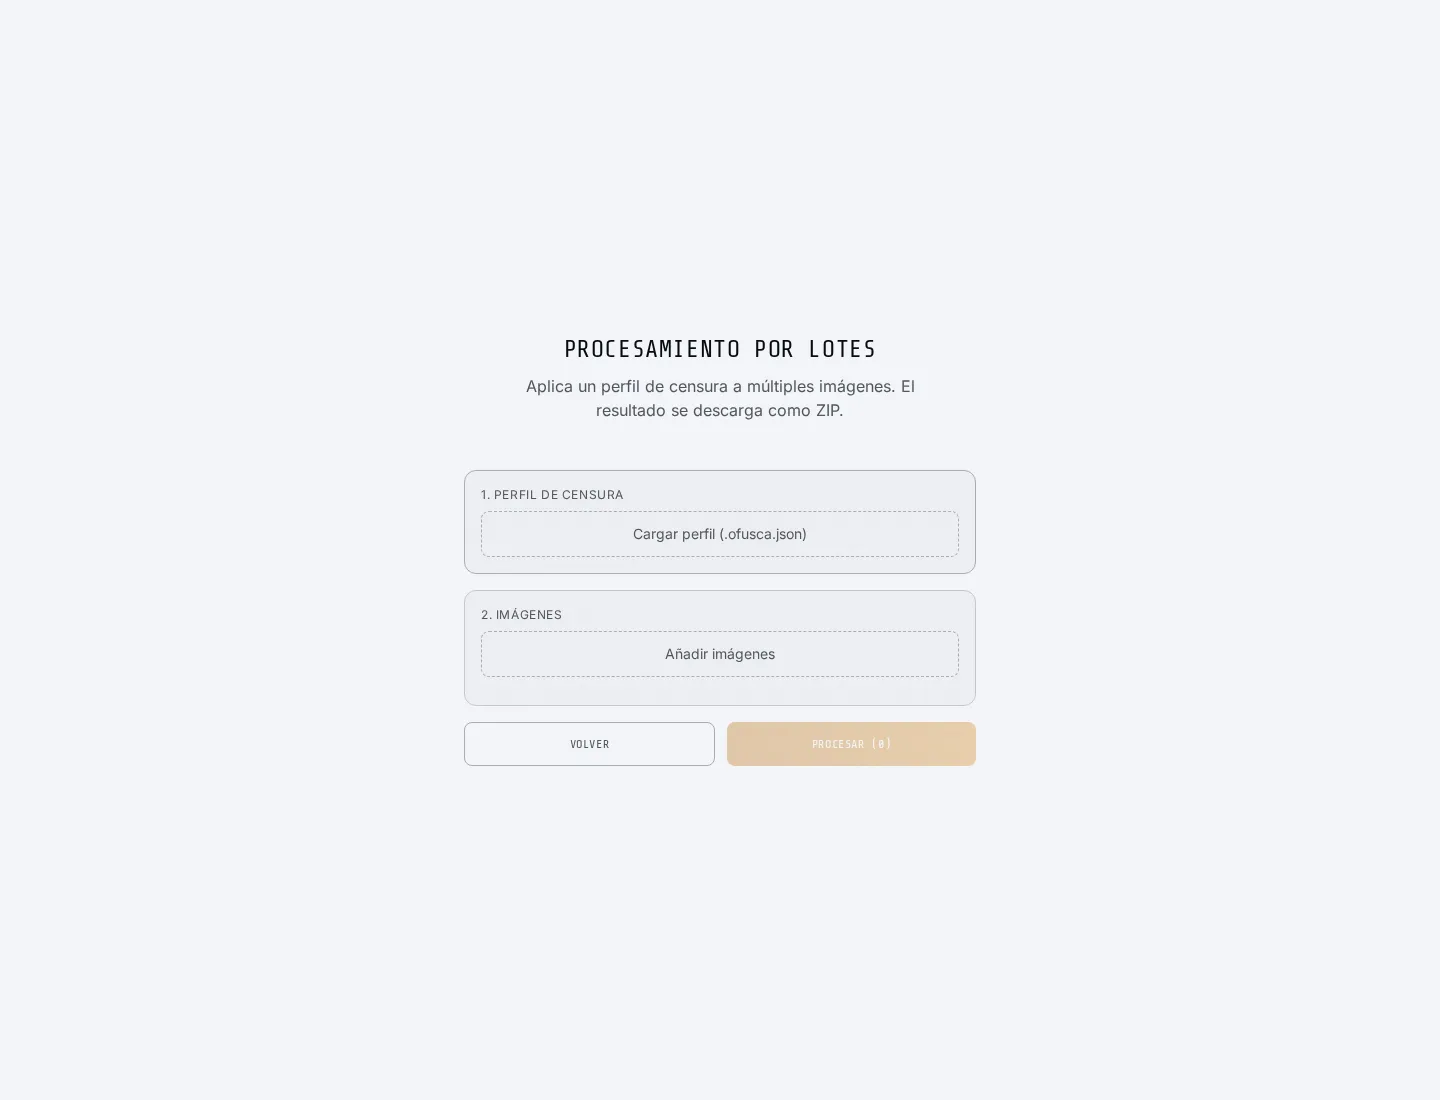
Batch processing
Batch mode lets you apply a redaction profile to multiple images. For the documentation screenshot, the dialog needs to be clean, with no files loaded:
Automatic redaction results
Automatic redaction combines face detection and OCR to identify sensitive data. The screenshot shows the summary of redacted items:

From PNG to WebP, automatic optimization
Each screenshot is generated in two formats. PNG works as the universal fallback, WebP cuts the file size dramatically with no visible loss in quality.
The conversion uses sharp, the fastest image processing library in the Node.js ecosystem:
import sharp from "sharp";
import { readdir } from "node:fs/promises";
import path from "node:path";

async function convertAllToWebP(dir: string) {
  const files = await readdir(dir);
  const pngs = files.filter((f) => f.endsWith(".png"));

  for (const file of pngs) {
    const input = path.join(dir, file);
    const output = input.replace(/\.png$/, ".webp");

    const { size: pngSize } = await sharp(input).metadata();
    await sharp(input).webp({ quality: 80 }).toFile(output);
    const { size: webpSize } = await sharp(output).metadata();

    const reduction = ((1 - (webpSize ?? 0) / (pngSize ?? 1)) * 100).toFixed(1);
    console.log(`${file}: ${reduction}% más pequeño en WebP`);
  }
}
The compression results are pretty striking. A few real examples from our screenshots:
- effects-panel.png, from 48 KB down to 5 KB in WebP (90% reduction)
- det-caras.png, from 689 KB down to 17 KB in WebP (97% reduction)
- auto-censurar.png, from 688 KB down to 17 KB in WebP (97% reduction)
- batch-mode.png, from 21 KB down to 2 KB in WebP (90% reduction)
- editor.png, from 316 KB down to 22 KB in WebP (93% reduction)
On average, the WebP versions weigh 90% to 97% less than the original PNGs. For a Help page that lazy-loads dozens of images, the difference is huge.
Integration in the Help page
On the frontend side, an Img component handles serving the right format using the HTML5 <picture> tag:
export function Img({ src, alt, className = "" }: {
  src: string;
  alt: string;
  className?: string;
}) {
  const webpSrc = src.replace(/\.(png|jpe?g)$/i, ".webp");

  return (
    <picture>
      <source srcSet={webpSrc} type="image/webp" />
      <img
        src={src}
        alt={alt}
        className={className}
        loading="lazy"
      />
    </picture>
  );
}
The browser automatically picks WebP if it supports it, otherwise it loads the PNG. The loading="lazy" property makes sure only images visible in the viewport get downloaded, which is critical when the page has more than 60 of them.
And this is what the full Help page looks like, with every screenshot generated by Playwright:
The experience is the same on desktop and mobile: the images adapt to the available width, and navigation switches from a sidebar to an accordion.
The numbers that matter
After implementing the automation, these are the concrete results:
- 62 image pairs (PNG + WebP) generated automatically.
- 46 help sections covered with updated screenshots.
- 7 categories documented visually: getting started, redaction, PDF, smart detection, security, collaboration, and productivity.
- ~93% average size reduction when converting from PNG to WebP.
- One command to regenerate every screenshot after an interface change.
What used to take a full morning now takes less than two minutes, the time Playwright needs to walk through every interface state, capture it, and convert it.
Lessons for your own project
If you maintain visual documentation of any kind, these are the main takeaways for us:
- Lock the viewport. Every screenshot should use the same dimensions. That removes visual inconsistencies and makes the documentation feel polished.
- One test, many screenshots. Chain screenshots in a single flow so you can reuse the app's loaded state. Restarting the browser for each image is unnecessarily slow.
- Wait explicitly. Use
waitForSelectororwaitForTimeoutbefore capturing. Animations and async loading produce incomplete screenshots if you don't wait long enough. - Generate two formats. PNG as fallback, WebP for modern browsers. The file size savings more than justify the extra step.
- Use
<picture>on the frontend. It's the standard way to serve conditional formats without extra JavaScript. - Always use lazy loading. With native
loading="lazy", images outside the viewport don't download until the user scrolls. A must when your page has dozens of screenshots.
The best documentation is the kind that updates itself. If every interface change means manual work to keep screenshots up to date, sooner or later you'll stop doing it. Automate it from the start.
The code for Ofusca and its Help page is already in production. If you want to see the final result of this workflow, visit ofusca.josemanuelortega.dev and click the help button (?).
Another entry in the Playwright in depth series. The next post is Playwright as the testing engine for JMO Labs.

Jose, author of the blog
QA Engineer. I write out loud about automation, AI and software architecture. If something here helped you, write to me and tell me about it.
Leave the first comment
What did you think? What would you add? Every comment sharpens the next post.
If you liked this
IA, Playwright y la transformación del testing en 2026
Playwright crece un 180%, Selenium cae al 22%, el 82% de los QA cree que la IA será clave y una nueva ley europea convierte la accesibilidad en obligación. Análisis de las herramientas y tendencias que están redefiniendo el perfil del tester en España.

Tests E2E que se reparan solos: cómo construimos un pipeline de self-healing con IA
Los tests E2E se rompen con cada cambio de interfaz. En JMO Labs construimos un pipeline de 5 fases con IA que planifica, ejecuta, repara selectores, diagnostica fallos y verifica resultados de forma autónoma. La caché de selectores hace que cada ejecución sea más rápida que la anterior.

Construir una plataforma de testing con Playwright: arquitectura de JMO Labs
Playwright no es solo para tests E2E. En JMO Labs lo usamos como motor completo: 9 fases de comprobación, localizador de 9 estrategias con self-healing, grabación de vídeo, testing responsive con viewports reales y accesibilidad con axe-core.